This is a quick tutorial on how to make the stick birdies you can see on my page titled “Simple The Best”.
Keep in mind that you can use other shapes to make these with, like circles, stars, hearts, like so.
Any template or shape should work. You can also find the bird templates in the freebies section of my Flickr pages. However any bird template should work if you already have one.
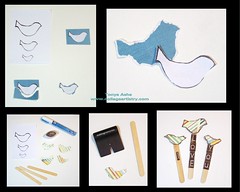
Step One: Cut out the bird templates.
Step Two: Find the desired papers you wish to use. Scraps are great for this and usually the perfect size.
Step Three: Use a removable/temporary glue to stick the template over the paper.
Step Four: Carefully tear around the edges, keeping the shape of the bird template. When you are satisfied with the results, remove the template from the patterned paper.
Step Five: If you have a paper distresser, use it to distress the edges a bit. If you don’t have an edge distresser, then just use your finger nail or the pop stick to rub and push around the edges. You may also want to lightly push the edges forward to get the exact look I achieved with mine.
Step Six: Take an ink pad and rub it gently across the edges you distressed.
Step Seven: Glue permanently onto the sticks. Note: I did not want my sticks all the same size, so I broke part of the tops off before attaching the birds.
Step Eight: Add stickers or other décor until you get your desired look.
Have fun creating!
For personal use only!
No comments:
Post a Comment