This is a tutorial on how to make the paper bag flowers. You may also use a wide variety of other materials to do this. Since I am using my Vintage Plum Kit, I decided to use the packing paper from my package to do this to make embellishment needed to finish my page.
Step one:
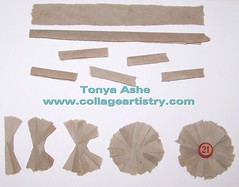
Tear 5-10 strips of the paper in approximately. 12x1 inch strips. You can play around with this and try different sizes too depending on the size you need for your project.
Step Two:
Fold each strip in half. Now you should have 12 inch folded strips.
Step Three:
Tear 2 inch pieces from the strips. This should yield you at least 5 strips, depending on the size you choose.
Step Four:
Take the two inch folded strips fold them in the middle. when you have a crease from the fold, open them back up and you can use the crease as a guide line for this next fold. Now fold the top part of the front side back. Make sure to leave the back side unfolded. Do the same on the bottom front part of the strip. Finish making up the rest of these pieces.
Step Five:
Then take another folded strip and place glue in place. You will want to slightly rotate the pieces around so you will be forming a circle as you glue these pieces together. When your flower is full bloomed, and just the way you want it, take one of the game pieces and glue to the center. Now that your flower is finished, just attach to your page or project.
No comments:
Post a Comment